Colosseum (17.0)
Release Summary
Security changes
We are pleased to announce that with this software release, we have implemented additional security measures to enhance the protection of your data and privacy. These security improvements include updates on data sharing rules, enforcing CRUD and FLS on objects and prevention of DOM-based XSS attacks. Our team has also conducted comprehensive security audits and testing to ensure the application is more resilient to potential threats. We are committed to providing you with a secure and reliable user experience, and we will continue to prioritize security in future releases.
Changes
-
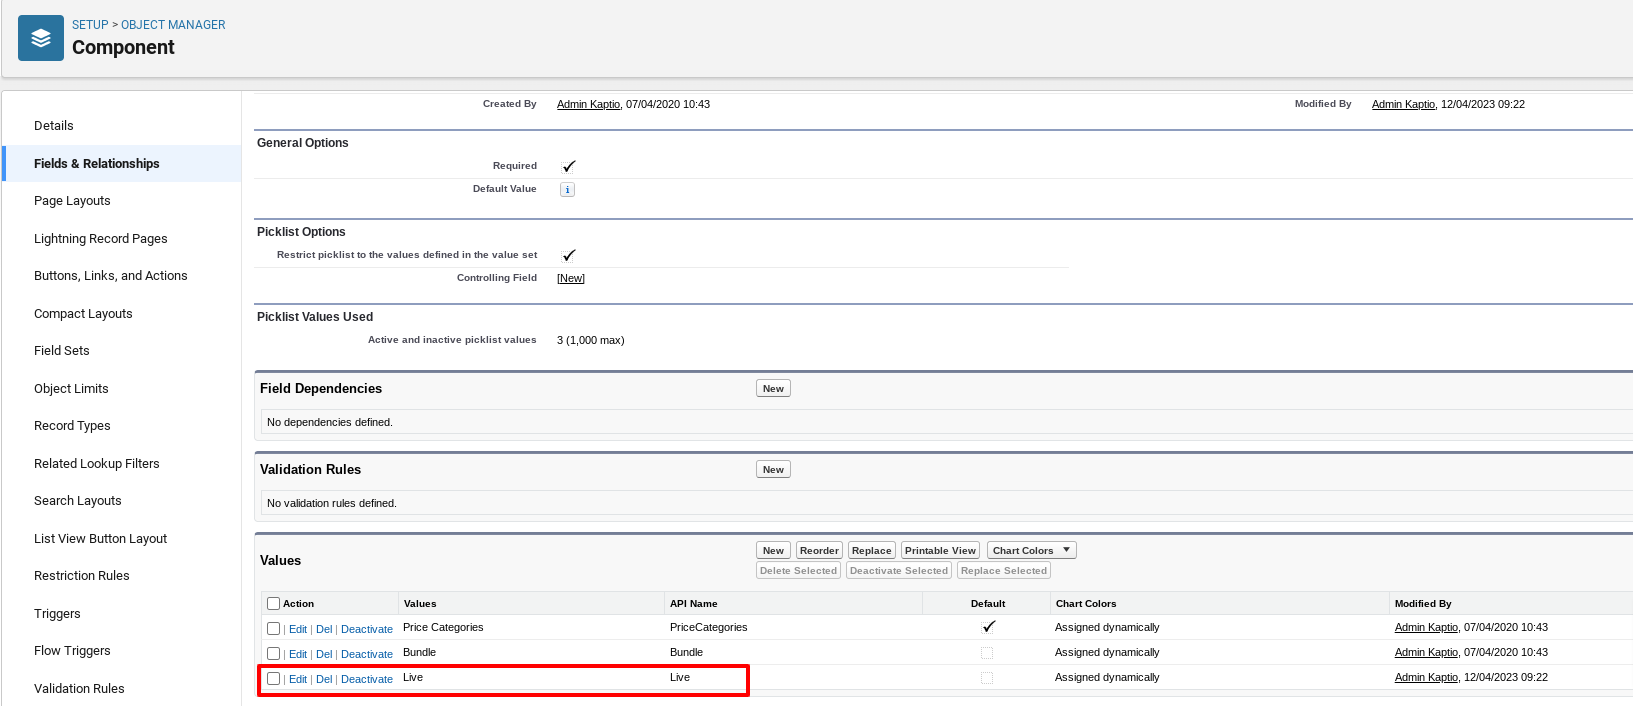
A new field, Is
Live (IsLivec)has been added to thePrice Category Object (Price_Categoryc). In order to support live API services in packages, it is necessary to introduce a function which will help to distinguish which component option is classed as a "live" service within the package. Additionally, this will also provide a clearer distinction of standalone API services which are not part of a package. Overall this will enable:-
A user to identify and select which component(s) of a package will rely on live pricing and availability and which will not
-
In parallel, this will help the Kaptio API behind the scenes to correctly process which component option is live and which is internal
-
Additionally, the "live" price category will also be used for caching purposes
-
Feature: Setup
-
-
The Car Rental tab has been temporarily disabled from the Service Search UI.
-
Feature: Service Search
-
-
Train Stations can now be stored as Location records, with a record type of TransportHub and a LocationType of Train Station.
-
Feature: Other
-
-
As TrainStationLocation has been deprecated and replaced with ServiceLocationJunction we have added a Post install script for migrating existing data. This is available in the post install steps page in Kaptio Settings.
-
Feature: Other
-
-
For API Accommodation services, a feature (configured and managed by Kaptio) has been added to not display non-refundable rates and/or rates where the free cancellation policy date is more than X hours before the check in date.
-
Feature: Service Search
-
-
In this release, we added a new checkbox field to the Service object: Requires Meal Plan. If checked, price categories will not be allowed to be added to itineraries without a meal plan option selected. This means that price categories without a meal plan will be hidden in costings and builder. If unchecked, price categories will be allowed to be added to itineraries without a meal plan option selected as they did previously.
-
Feature: Setup
-
Related to support ticket: KHELP-8305
-
Metadata changes:
TrainStationLocation has been deprecated and replaced with ServiceLocationJunction.
See our changelog for details: https://docs.kaptioapis.com/kaptio-travel/-/changelog#temp:C:MOc42df50fe5a9d4ec08afa98392
New Features
Rail Service Search
We are including brand new features that improve the user experience when searching and managing rail services in an itinerary.
The Rail Service Search will allow users to search for Live Rail. Rail services can be connected to third party suppliers for Live Inventory.
Search & Cost
In order to use the 3rd Party Supplier connections, you need Itinerary Builder, and the new (Supplier) Bookings component enabled. We also make an assumption that you have pre-selected your Primary Locations in the Builder, and chosen a City as the location for your search.
Searching for a train journey
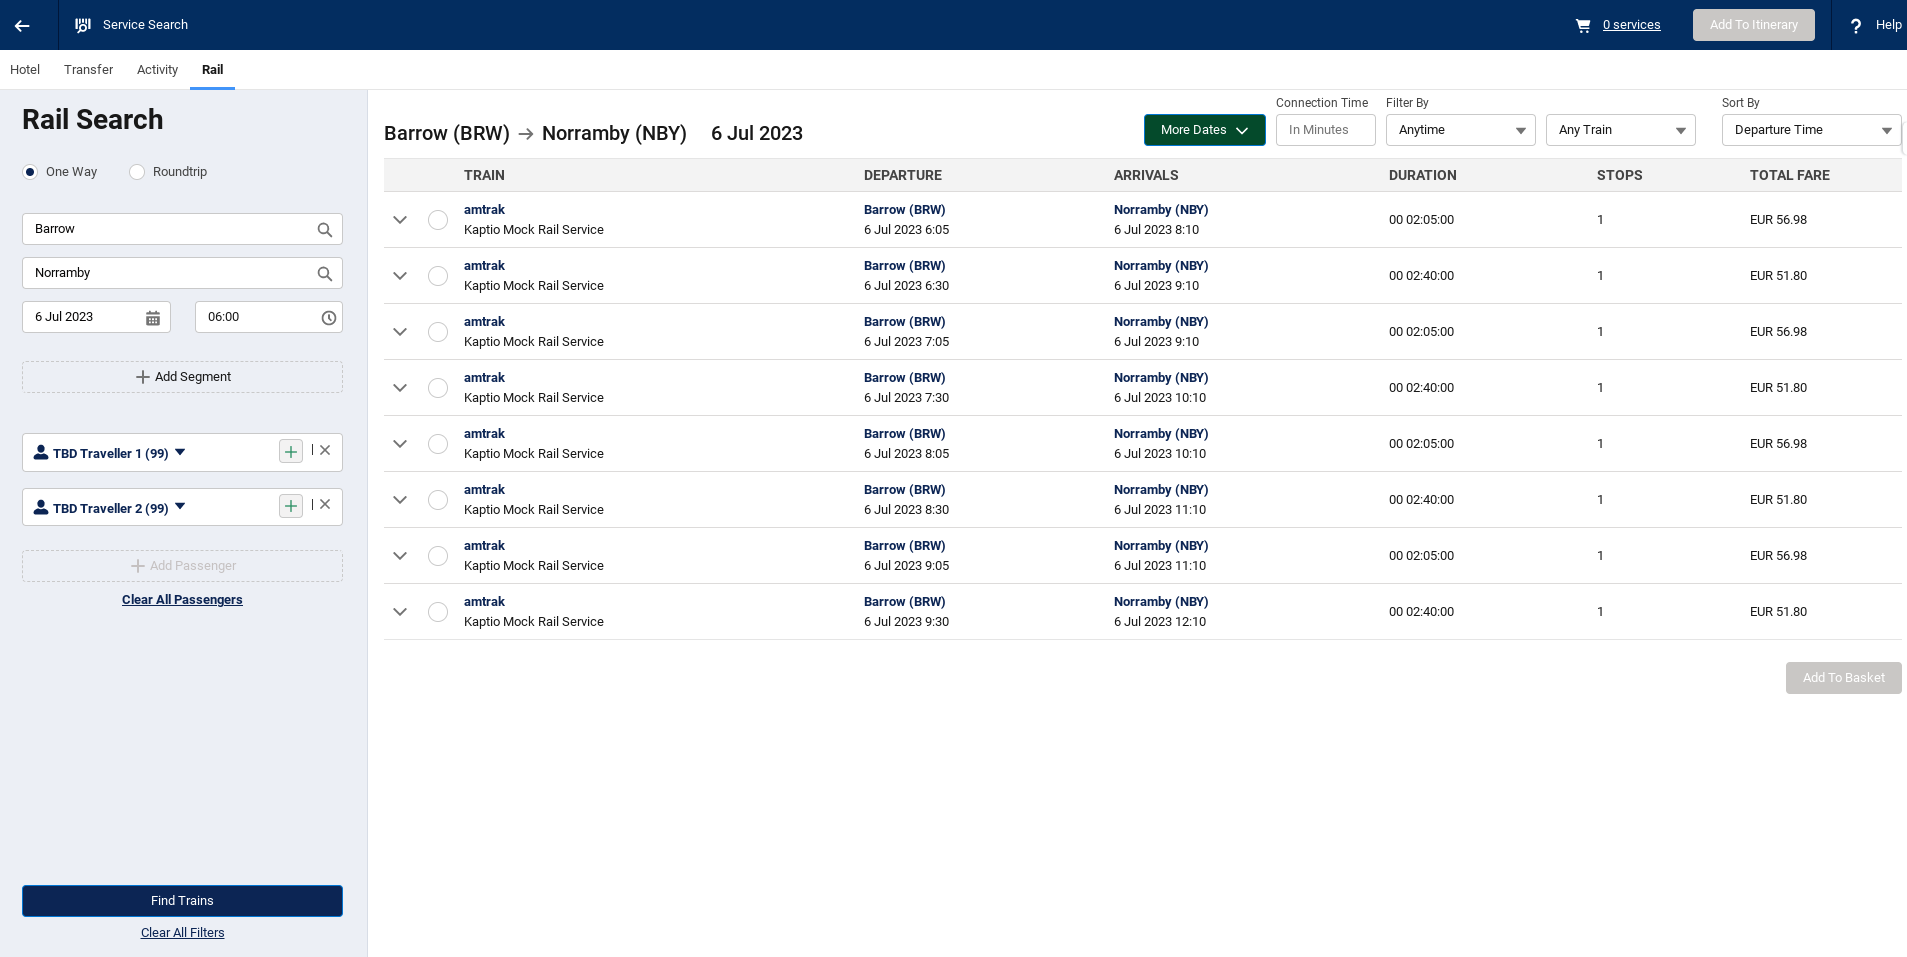
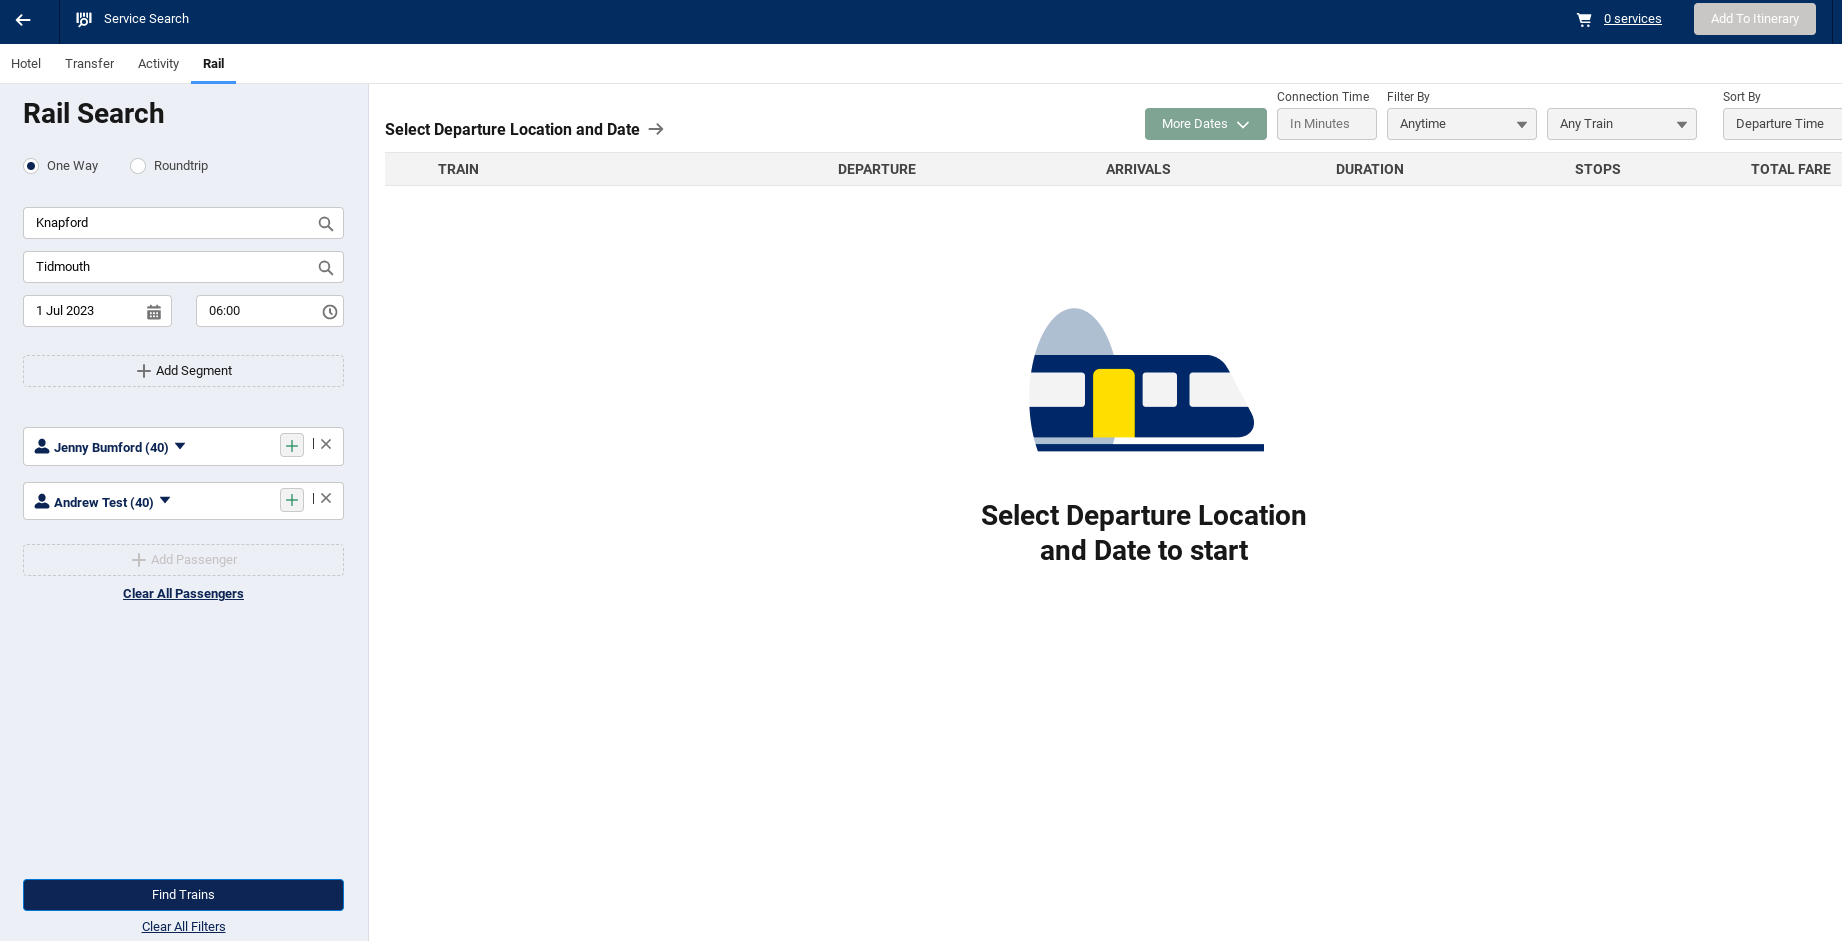
You can search in Itinerary Builder for a specific rail journey, using the Kaptio Service Search. Select the Rail Record type and Service Search. The Service Search screen will open with the following pre-populated:
-
One Way: One way is the default search, but this can be changed to a Roundtrip (return) if required.
-
Date: this date is populated from the itinerary builder line
-
Time: 06:00 am is the default time trains will be search after, but this can be amended.
-
Passengers: the passengers are auto-populated from the Itinerary Passenger tab
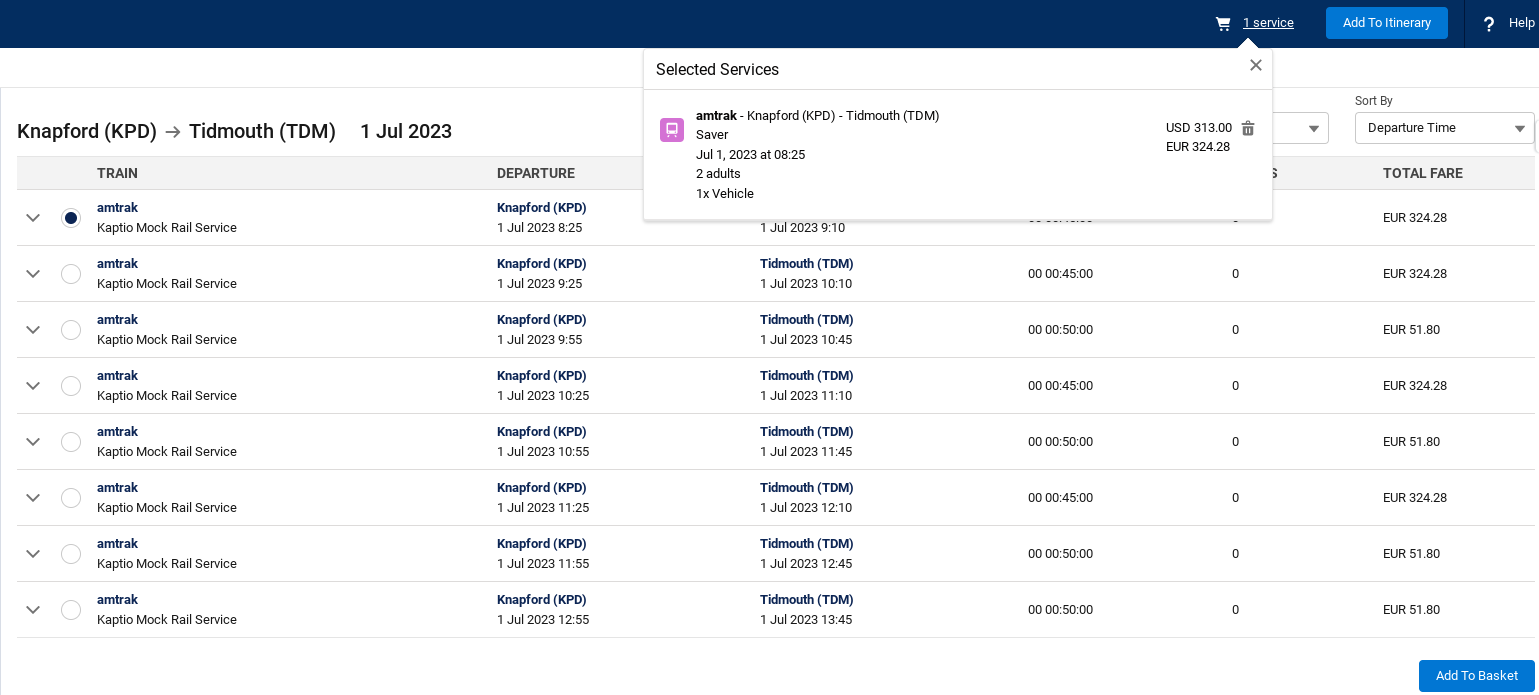
You can then amend your search date, and add in the Train Stations (From and To), add segments (if required) and Search for the Trains.
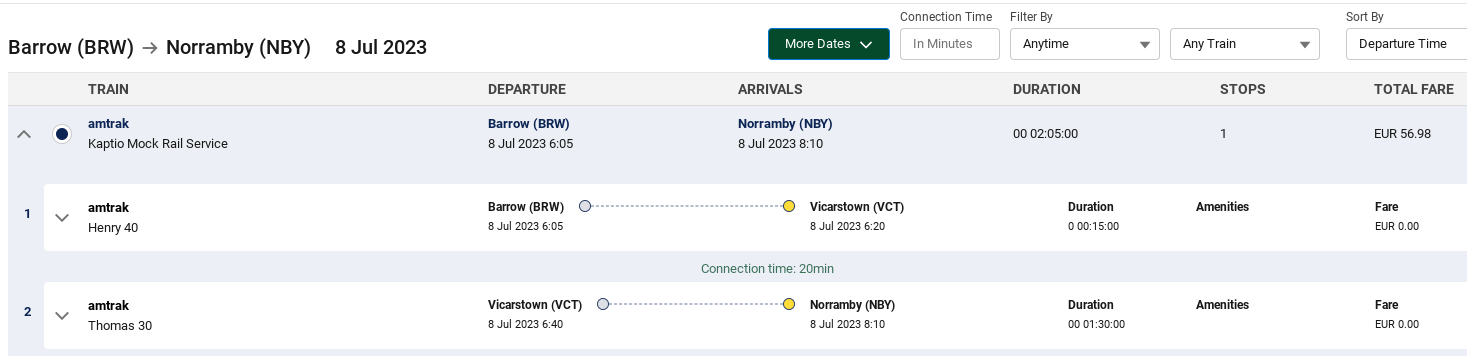
View Results
The results will display sorted by departure time as the default. Sorting by lowest fare, shortest duration and fewest stops are also available on the results.
You’ll also see the train departures - displaying the operator, departure and arrival train stations, duration, stops and total fare price.
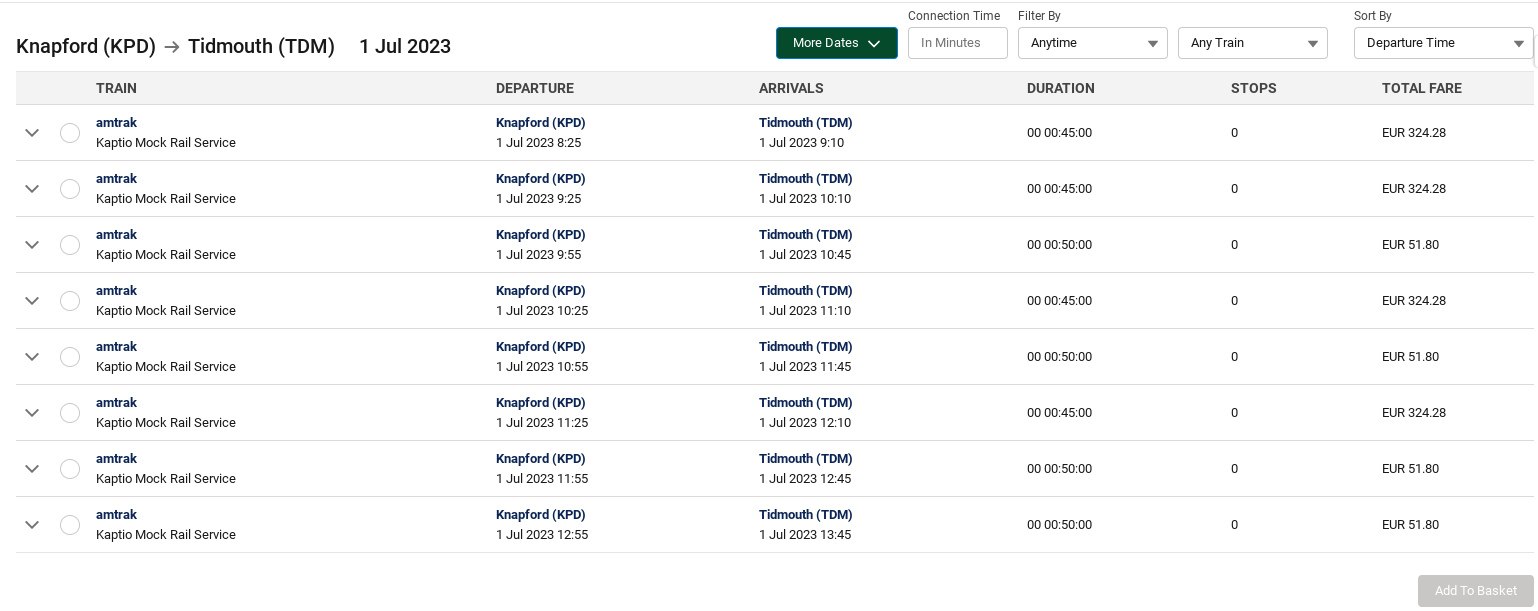
You can use the Filters to fine tune your search by train name, time of day e.g. morning and also minimum connection time.
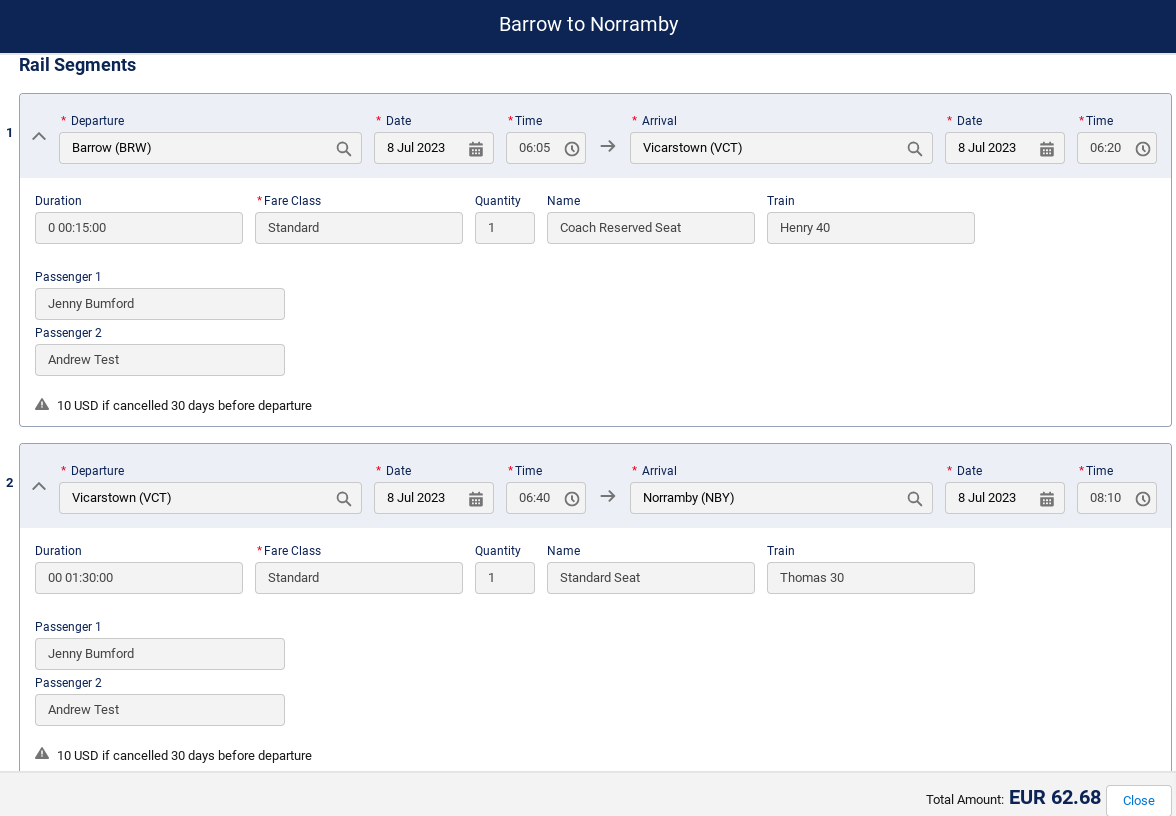
Adding to Basket & Itinerary
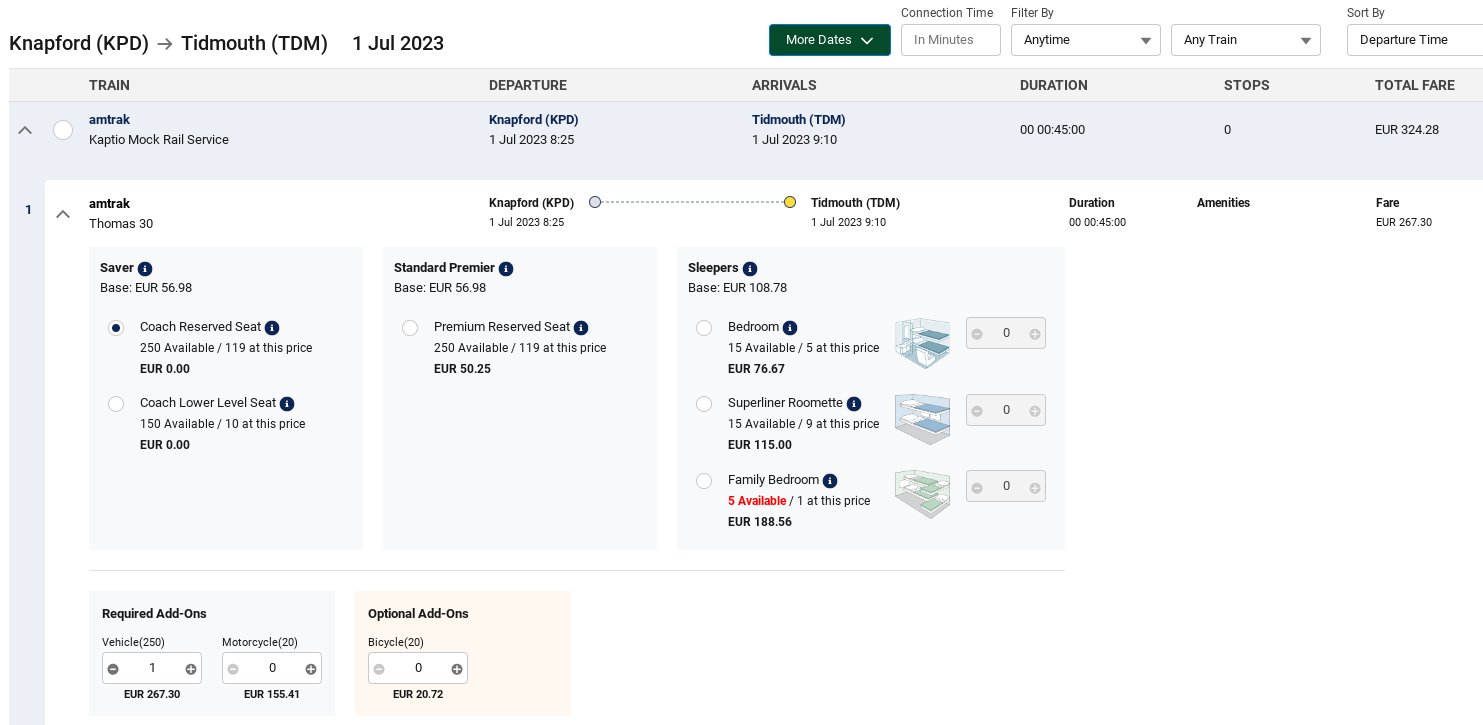
Select your train journey by clicking on the radio button, and then clicking Add to Basket. This will add the cheapest fare for that train journey but you can expand and select an upgraded fare e.g. Premier or Sleeper, depending on what is available for the specific journey.
You can add as many journeys as you wish to the basket before adding it to your Itinerary. You can view the Services in your basket and choose to remove them too.
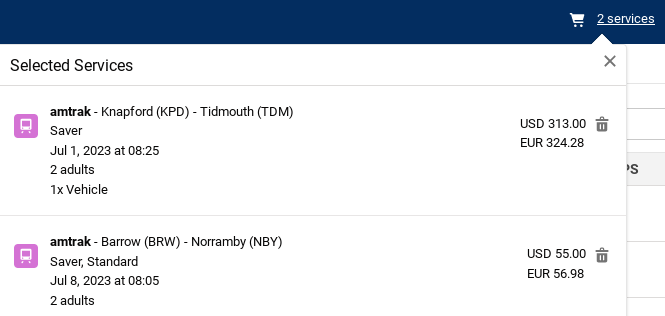
When you’re ready to add them to your Itinerary, click on Add to Itinerary and then save in the Builder.
Itinerary Builder
Once your selected train journey has been added to Builder, you can take advantage of all of the rich functionality that already exists in Builder, like deleting and shifting dates as well as being able to re-check live rail availability and prices.

How to enable
Land Supplier & Gateways
From a setup perspective, to prepare your org for the feature, you will need to execute the following steps:
-
You’ll need to set up an Encryption Key. This will be used to encrypt the authentication details on the Connect Land Supplier record. It should be set BEFORE you enter the authentication details in the Connect Land Supplier record. The value should consist of exactly 32 characters and can be anything you wish. But make sure you provide the Kaptio API Team with this key, so that they can configure the connection. To enter the Key details, go to Setup, Custom Settings, App Settings and enter your key into the Encryption Key field.
-
Find the Connect Land Supplier tab. This is where you will create an instance of your Supplier credentials. Please provide:
-
Minion Label: the internal name of the Supplier system
-
Authentication Details: Provide the API login credentials in the following JSON structure
{ "mode":"production", "id":"your-api-id", "password":"your-api-password" }.
Please note that after you click Save this information is tokenised and stored securely within our systems. -
Minion API Name: For example,
Kaptio Mock = SPI-TEST-R.
-
-
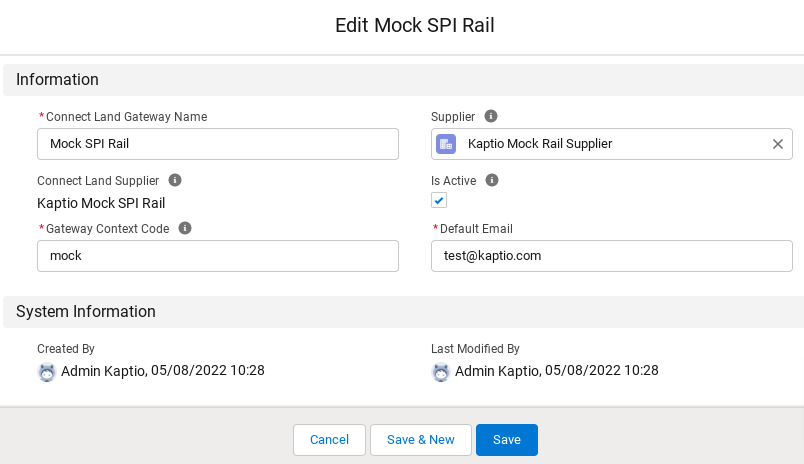
Once you have successfully created the record, click on the related tab where you can define specific Supplier Gateways that are accessible through the GP Land Supplier credentials. Click on New Gateway and provide:
-
Connect Land Gateway Name: enter the Gateway Supplier e.g. Mock SPI Rail
-
Connect Land Supplier: this is set automatically to the land Supplier system whose credentials you will use.
-
Gateway Context Code: unique identifier of the Gateway in the Land Supplier system e.g. mock. NOTE: For the Rail API development, this is not required to send requests/responses but will be used for session logs.
-
Supplier: Defines the account that will be used as the Supplier and invoice To record for all the bookings made via the Gateway. Enter the Kaptio Account (Supplier record type required). NOTE: Kaptio recommends the same Supplier is also linked to the Rail API Service.
-
Is Active: check to flag an active Gateway
-
Default Email: the email that is passed to the Supplier as the email of the passenger. It is uncommon for an FIT tour operator to pass the end client’s email to the 3rd Party Supplier, therefore this email address will be passed instead.
-
Now that you have set up a Land Supplier and a Land Gateway, you can start to create Locations and create mapping records against your Services.
Setting up Locations
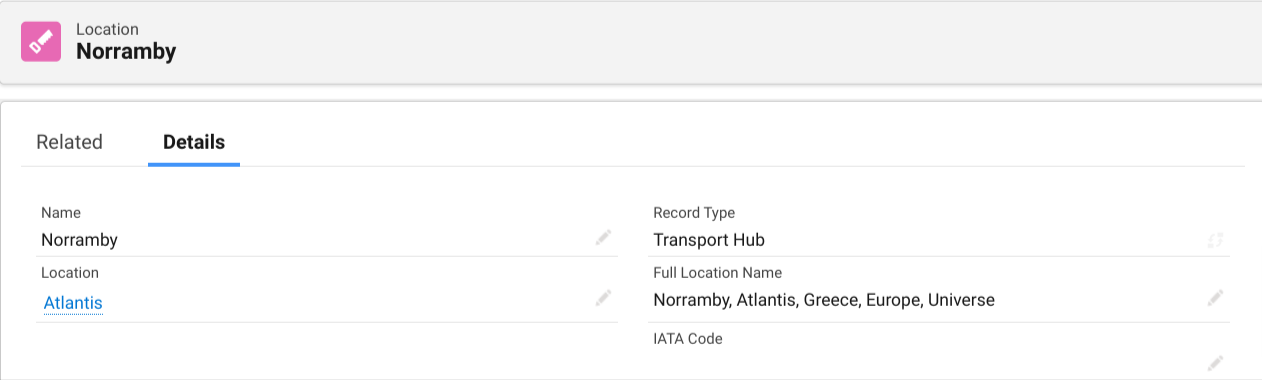
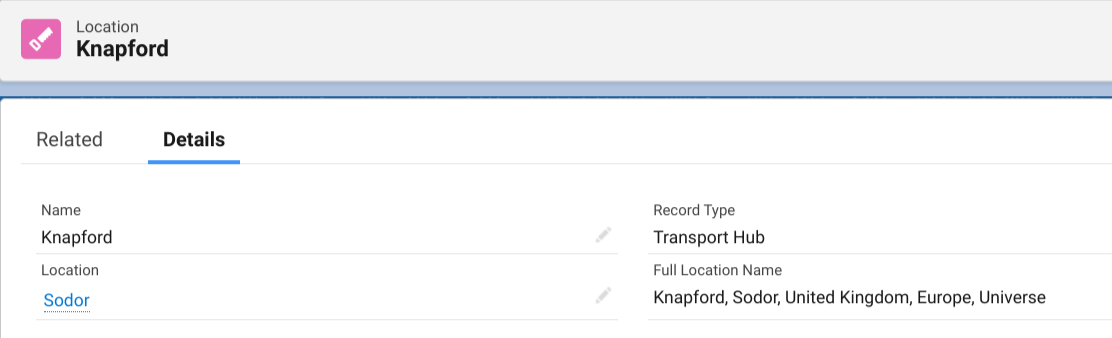
Each Train Station needs to be set up as a location with a Transport Hub Record Type.
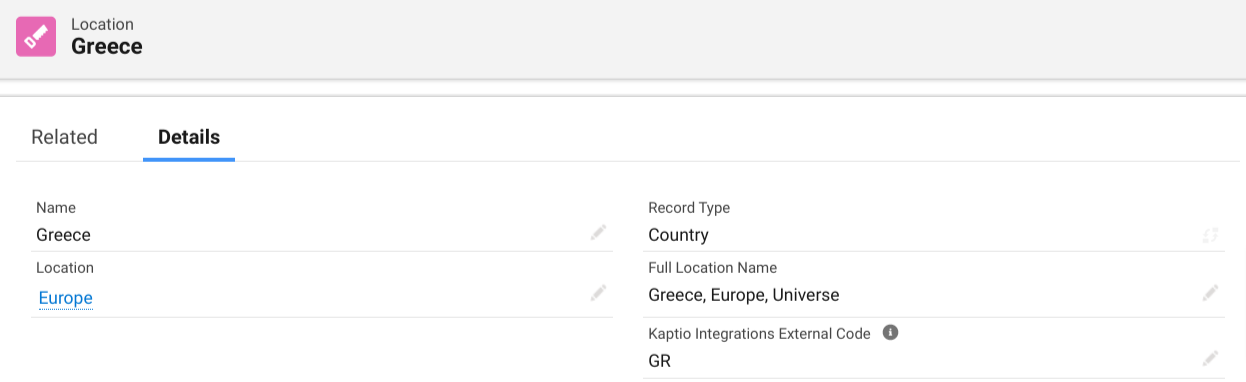
The Country linked to the Transport Hub needs to have to the 2 letter (ISO 3166 international standard) Country Code added using the Kaptio Integrations External Code field.
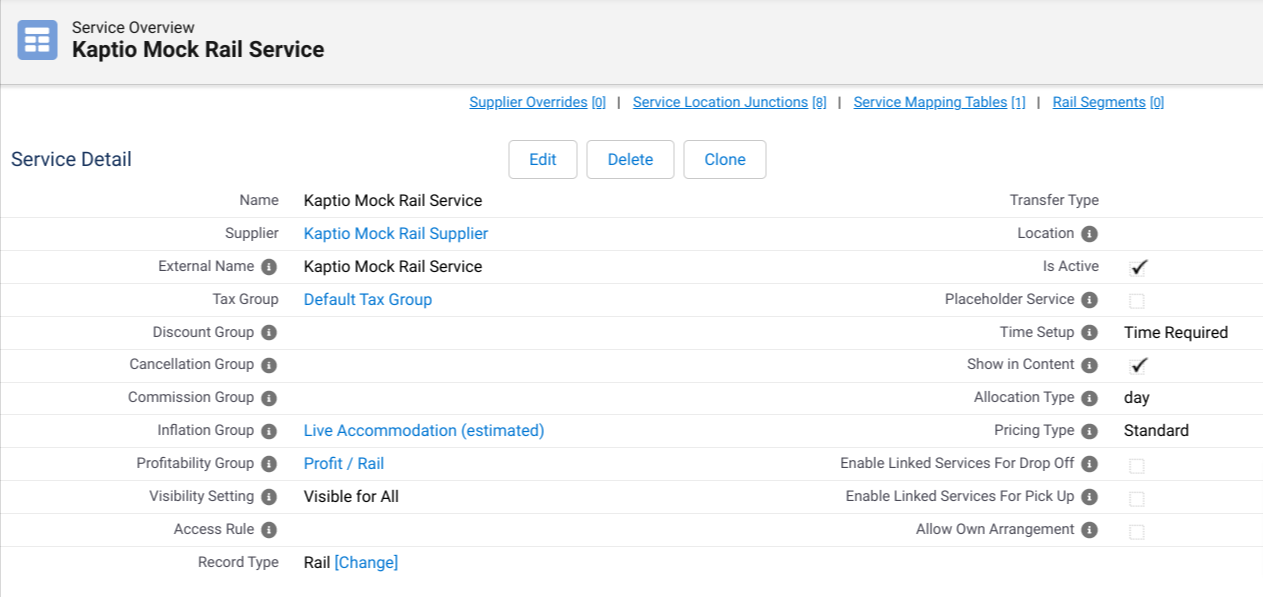
Setting up a Rail Service
You need to set up a Service using the Rail record type. This will be used when booking through the API. It needs some basic information to exist. Leave defaults except:
-
Name: enter the name of the Service e.g. Kaptio Mock Rail Service.
-
*External *Name: enter the name of the Service e.g. Kaptio Mock Rail Service.
-
Supplier: link it to the generic Supplier that will be used for all Rail API bookings e.g. Kaptio Mock Rail Supplier. **
Check that the Supplier Confirmation Method (on the Supplier Account) should be set to ‘Not Set’. -
Is Active: True.
-
Allocation Type: set this to Day, this will then display dates and times on the Itinerary Builder.
-
Tax Group: link to your default tax group.
-
Profitability Group: Attach the relevant profitability group which will apply the markup to all Rail API bookings.
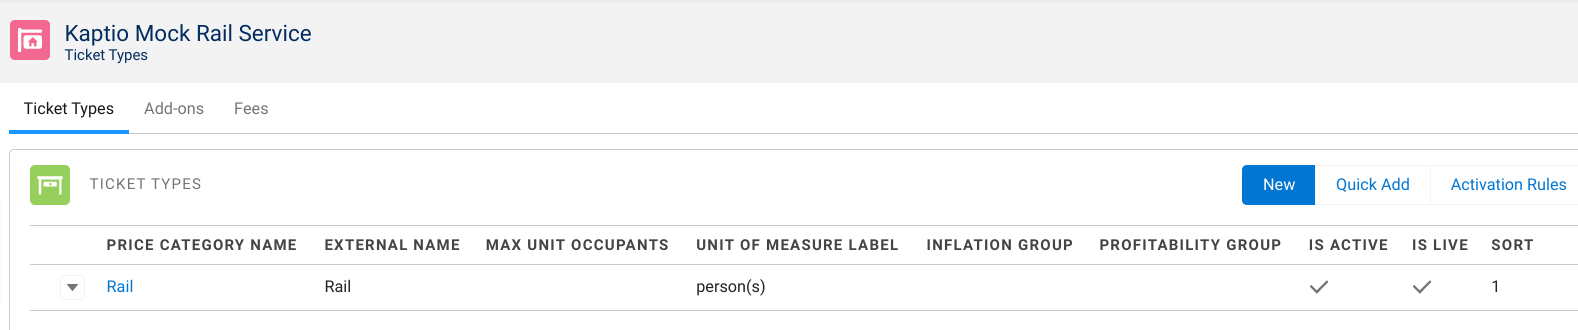
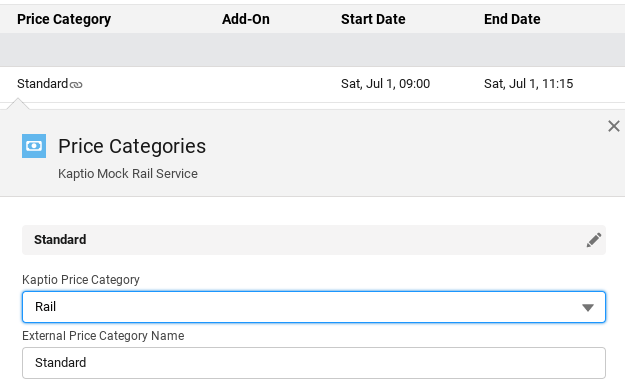
Price Categories
You need to set up one price category on your Service with a Per Person unit of measure. All other entries can remain unchanged. This will be used as the Kaptio Price Category which will display in Itinerary Builder, alongside the API name of the fare using the External Price Category Name field:
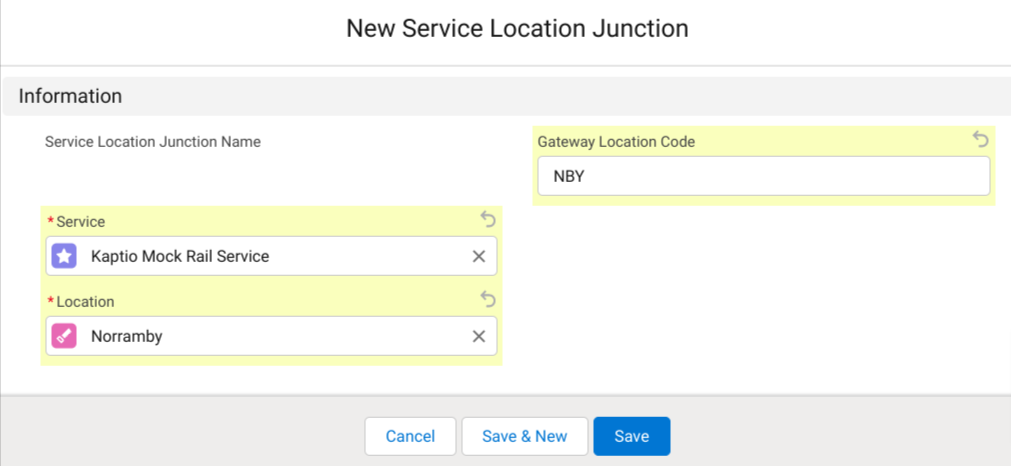
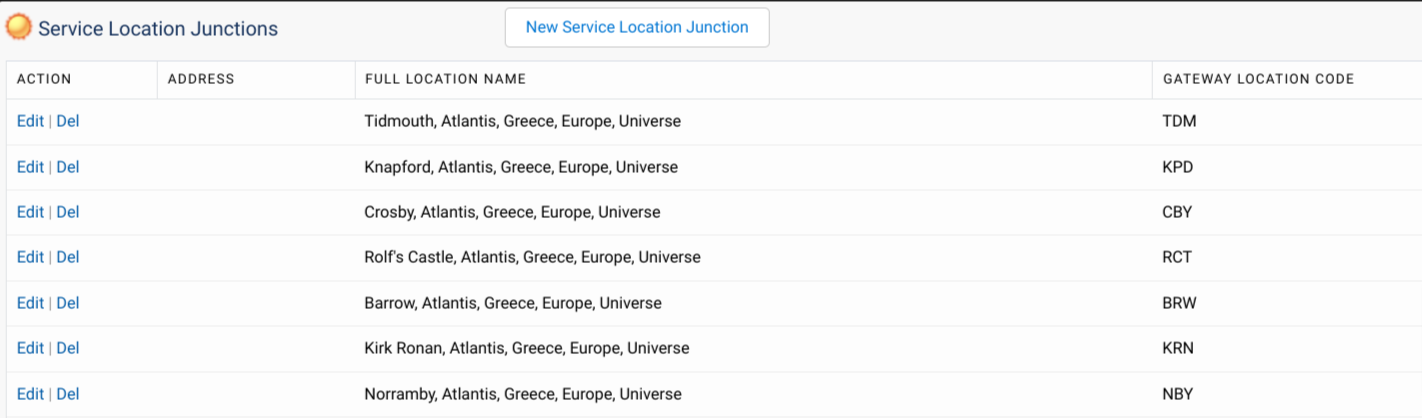
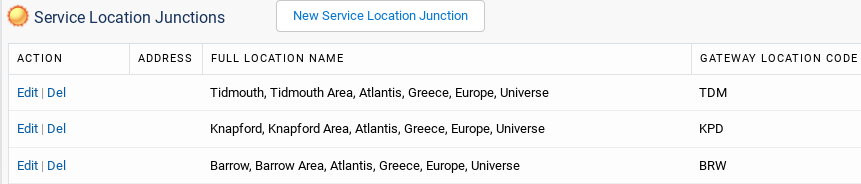
Service Location Junctions
In the Related list for Service Location Junctions, ALL train stations supported in the API, and for which you require results, need to be set up.
-
Service: a relationship to the Kaptio Service that you are connecting to the train station
-
Location: a relationship to the Location in which the train station is situated e.g Norramby (Transport Hub record type)
-
Gateway Location Code: the unique station code that will identify the station in the API request e.g. NBY
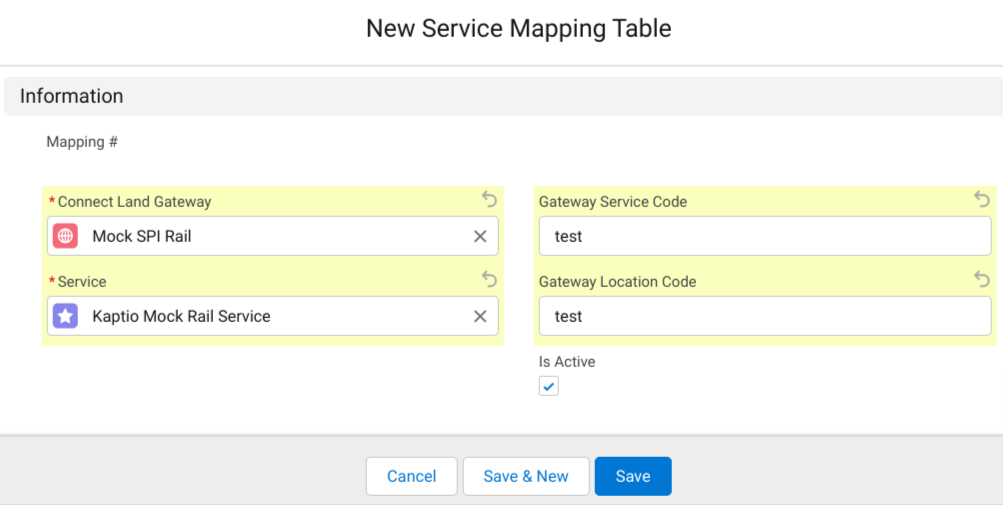
Service Mapping Tables
Rail API Services are set up using a unique Service for all results, or a few services related to an Operator/area e.g. America/Amtrak and Europe.
Before you start searching for inventory, you will need to create a mapping entry against your Kaptio Service. This is to ensure that you are mapping your Kaptio Service against a valid Service from the Supplier Gateway.
The mapping information is managed in the Service Mapping Table object. The table contains the following information:
Connect Land Gateway: a relationship to the Gateway you’ve now set up (as per previous steps). This is where we inherit the Gateway Context Code, which is passed into our Connect API when looking for inventory from that particular Gateway. * Service: a relationship to the Kaptio Service that you are connecting to the Gateway. * Gateway Service Code: this is not a mandatory field for API Rail as we are using the Service Location junction, but a value is required here e.g. test
+ NOTE: The value needs to be unique as duplicates are not permitted.
+ * Gateway Location Code: this is not a mandatory field for API Rail as we are using the Service Location junction, but a value is required here e.g. test
+ NOTE: The value needs to be unique as duplicates are not permitted.
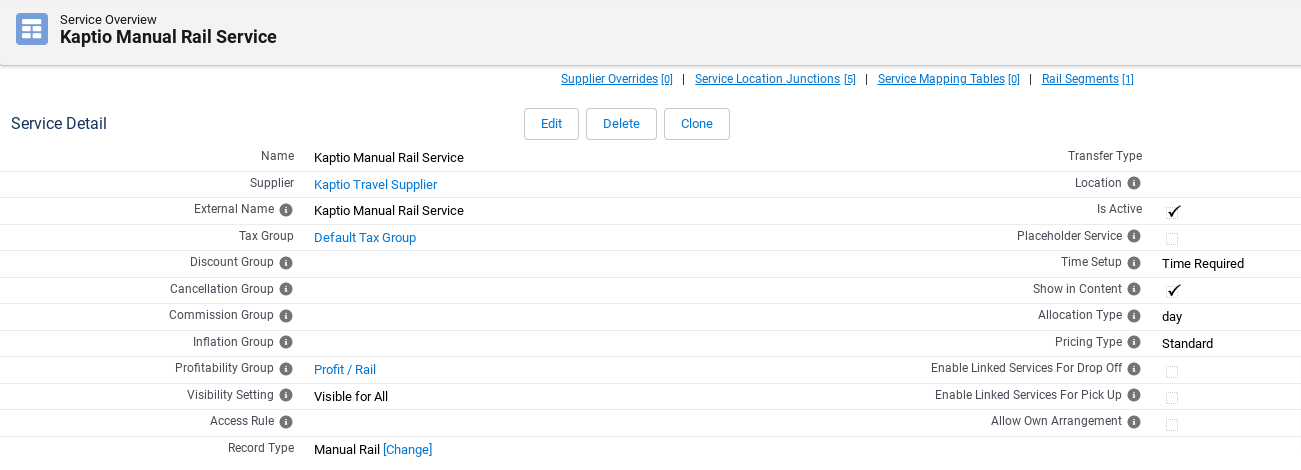
Manual Rail
In this release we are introducing Manual Rail, which allows sales users to easily add rail bookings to their itineraries.
Manual Rail Services are rail journeys that are added to an Itinerary by a user that are not available through electronic booking channels (using an API connector), or those that might be available via the electronic booking channel, but where the date is out-of-range for booking.
Manual Rail is available from the the Itinerary Builder by selecting a new Service, the Manual Rail record type and then Manual Rail.
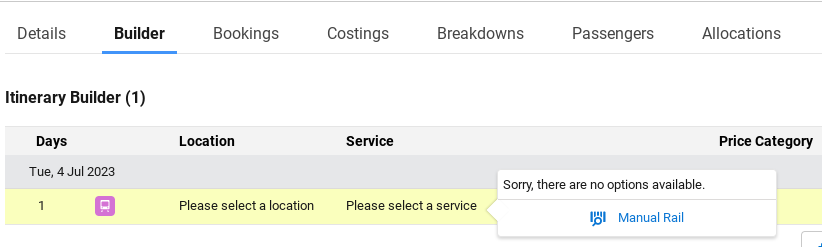
With Manual Rail, rail journey details are entered manually. Users can define multiple segments for the Manual Rail journey if required.
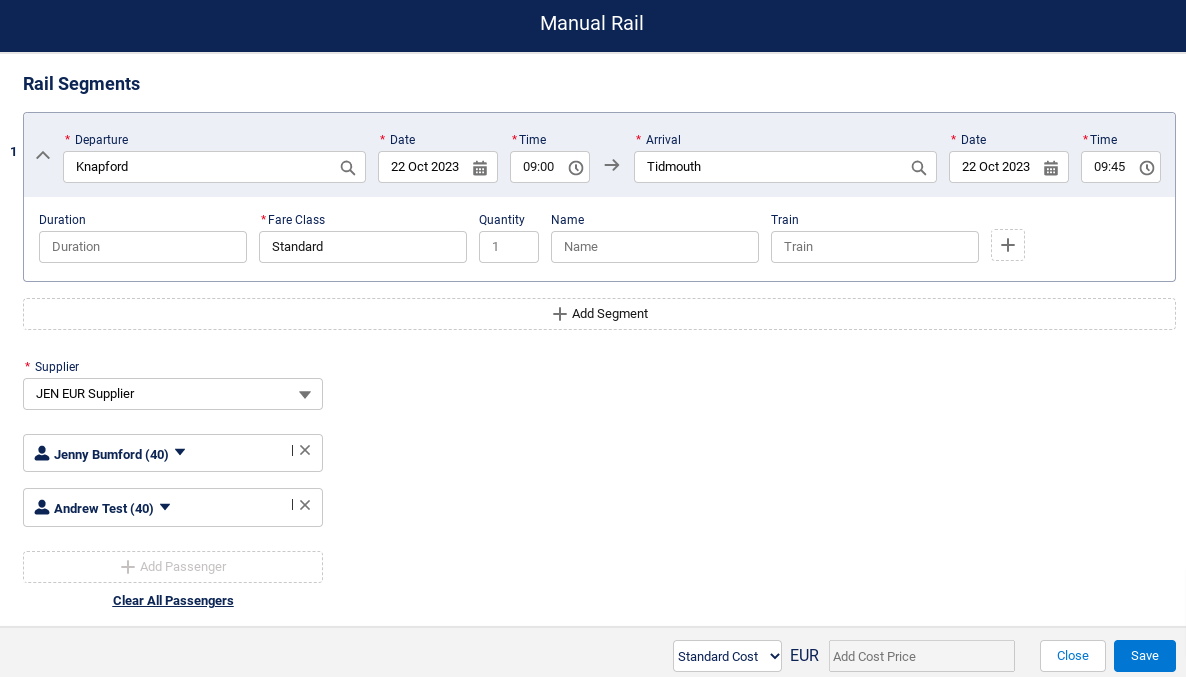
The following fields are mandatory and need to be completed for the Manual Rail to be saved:
-
Departure: selected from the Train Station Location list, e.g. Knapford
-
Date: departure date
-
Time: departure time in “hh:mm“ format
-
Arrival: selected from the Train Station Location list, e.g. Tidmouth
-
Date: arrival date
-
Time: arrival time in “hh:mm“ format
-
Fare Class: free text field to allow the type of fare to be inputted e.g. Standard
-
Supplier: selected from the Account - Supplier Record Type
-
Passengers: the passengers are auto-selected from the Passengers on the Itinerary. Passengers can be de-selected if they are not required for the Manual Rail booking.
The Save button will be enabled once the mandatory information has been entered.
The following fields are optional and can be completed before the initial save or after (when amending the Manual Rail).
-
Duration: free text field to allow the duration to be inputted e.g.00 00:45:00 (days, hours, mins and secs)
-
Quantity: free text field for quantity. This would normally default to one but if booking a Roomette this could be changed to the number of roomettes that are required.
-
Name: free text field to allow additional information on the Fare e.g. Saver
-
Train: free text field for the Train name e.g. Amtrak 60
-
Add ons: clicking the + icon allows for Train add ons such has vehicles and bicycles to be added e.g. Vehicle

The Add Segment button allows the user to add additional segments for this specific Manual Rail to show a different train journey e.g. 1st Segment/train = Knapford to Tidmouth and 2nd Segment/train = Tidmouth to Barrow.
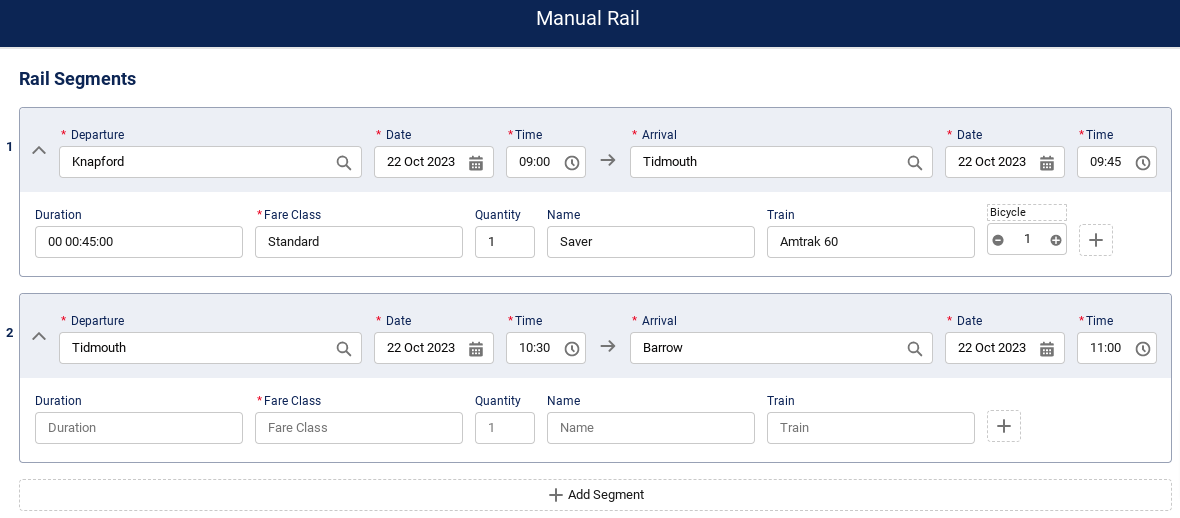
A maximum of 9 segments can be added.
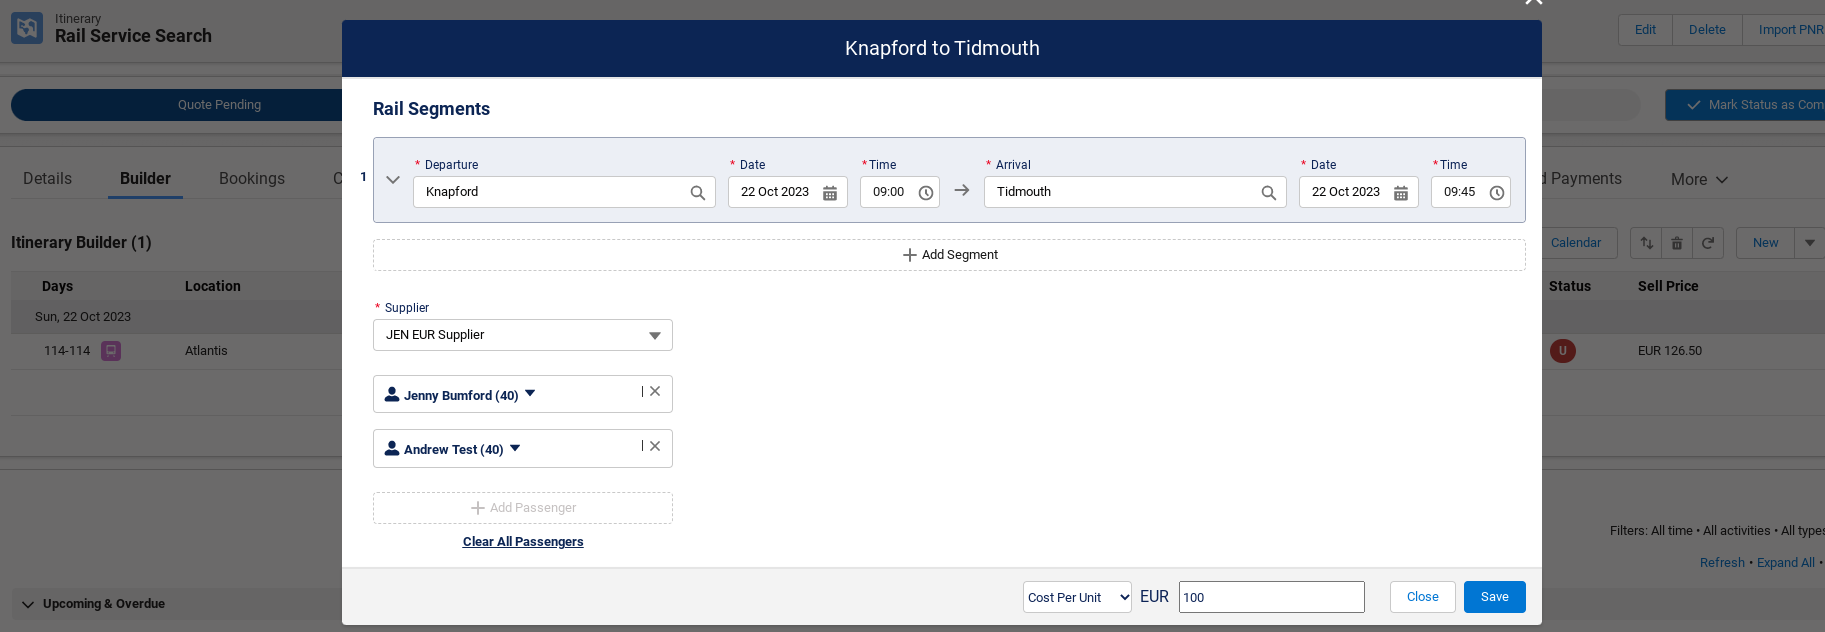
The next step is to add a Cost Price for the Manual Rail if required. This can be entered either as a Cost Per Unit or Cost Per Person. The Currency code will change depending on the Account currency linked to the Supplier Account (selected in the previous step).

Once saved, the Manual Rail will display in the Itinerary Builder as per a 3rd party Live/API Rail service.

The Manual Rail details can be updated if required by clicking on the Rail Service (from and to).
How to enable
The Manual Rail service is currently only available from the Itinerary Builder. From a Setup perspective, you will need to execute the following steps:
-
In
Kaptio Settings>Service Record Types, assign theManual Rail ServiceRecord Type
-
Ensure Profiles have the record type assigned (
Profiles>Profile Name>Object Settings>Services>Assign Record Types) -
Create a new Service using the Manual Rail Record Type, a new Service Record Type. This service acts as the Source Manual Rail Service, configured in Kaptio Settings. The supplier of this service is overridden for each itinerary, so the service can be assigned to any supplier account, for example an internal supplier account. The allocation type should be set as day. The price categories defined for this service will be shown under the Price Category column after adding the Manual Rail to the Itinerary Builder. The price category unit of measure should be set as per person.
-
Each Train Station needs to be set up as a location with a Transport Hub Record Type.
-
In the Related list for Service Location Junctions, ALL train stations required for the Manual Rail need to be set up.
-
Service: a relationship to the Kaptio Service that you are connecting to the train station
-
Location: a relationship to the Location in which the train station is situated e.g Knapford (Transport Hub record type)
-
Gateway Location Code: a unique station code that will identify the station in the Service Location junction logic e.g. KPD
-
In
Kaptio Settings>Service & Package Settings, a drop down labelledSource Manual Rail Serviceis used to define the general Manual Rail service. This service acts as the source which is then adjusted at itinerary level for each Manual Rail booking.
Once the set up steps have been completed, Manual Rail will become available in the Itinerary Builder component.
Live Rail Package Components
In this release we have made it possible to allow live services to be added to Packages. This feature concentrates on Live Rail but lays the foundation to allow Live Accommodation in packages in a subsequent release.
How to enable
Rail Service Search
From a setup perspective, to prepare your org for the feature, you will need to execute the following steps:
-
Setting up Land Supplier & Gateways
-
Setting up Train Station Locations (using the Transport Hub Record type)
-
Setting up a Rail Service
-
Adding the Train Station in the Service Location Junction
-
Configuring the Service mapping table
-
These are the same steps that are required for the Rail Service Search. See Rail Service Search Release Notes for the setup details.
Component Type Pick List
A value of Live needs to be added to the Component Type pick list (Component Object)
Package set up
A new button called New Live Component has been added to the Package Editor to allow users to select and configure the Live Rail Component.
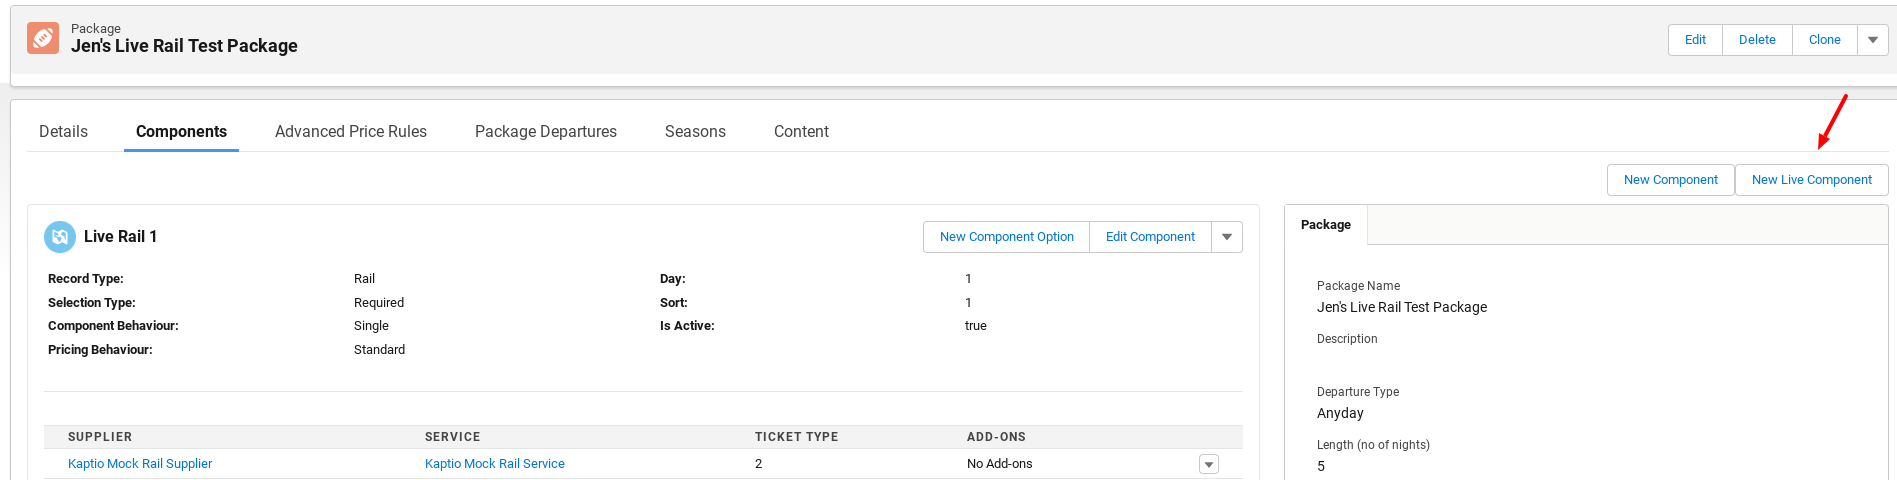
This displays on Bundles and Packages record types.
After selecting the New Live Component, a popup displays to add the Component requirements. The fields display as per the current feature, however the record type is only enabled for Rail.

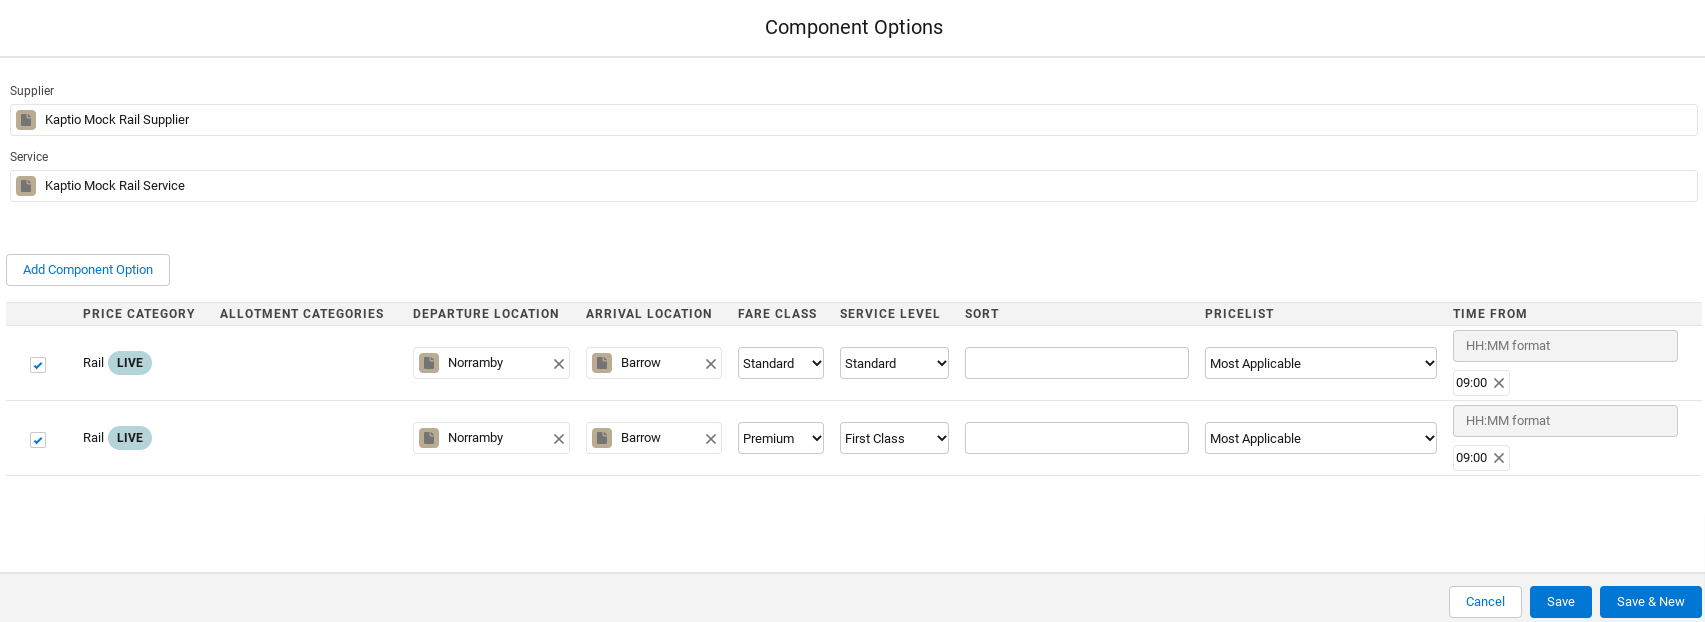
For Live Rail Components, the Component option UI has been modified to allow users to configure as follows:
-
For Live Rail components, it only allows Component Options belonging to a single Service i.e. does not allow multiple different Services in the same component.
-
For each Component option, users can specify the departure location, arrival location, fare class, service level and time from
-
Departure and arrival location are mandatory fields
-
Fare class, service level and time from are optional fields
-
-
The fare class field shows three options; Standard, Premium and Bedroom
-
The 3 fare class options are predefined in the KaptioTravel system, and the customer’s Rail API has to group the returned fares into these 3 exact classes.
-
If a fare class is not specified, the system will try to select the cheapest in the following order; cheapest standard fare price, cheapest premium fare price, cheapest bedroom fare price
-
-
Only one time can be added in the Time From field in a HH:MM format.
-
When a user clicks on 'Add to Itinerary' on the Package results, and the system executes a live-search, the system will use the time that is configured here (9 am in this example). If no time is configured then it will use the default time as per the Rail Search screen which is 6 am.
-
-
The Price Category can be selected multiple times by clicking on Add Component Option in the Component Options modal. This allows users to configure with different values for departure location, arrival location and fare class e.g.
-
Norramby to Barrow on a Standard fare class, which is linked to a Standard Service Level
-
Norramby to Barrow on a Premium fare class, which is linked to a First Class Service Level
-
Once the component option is configured the user can save.

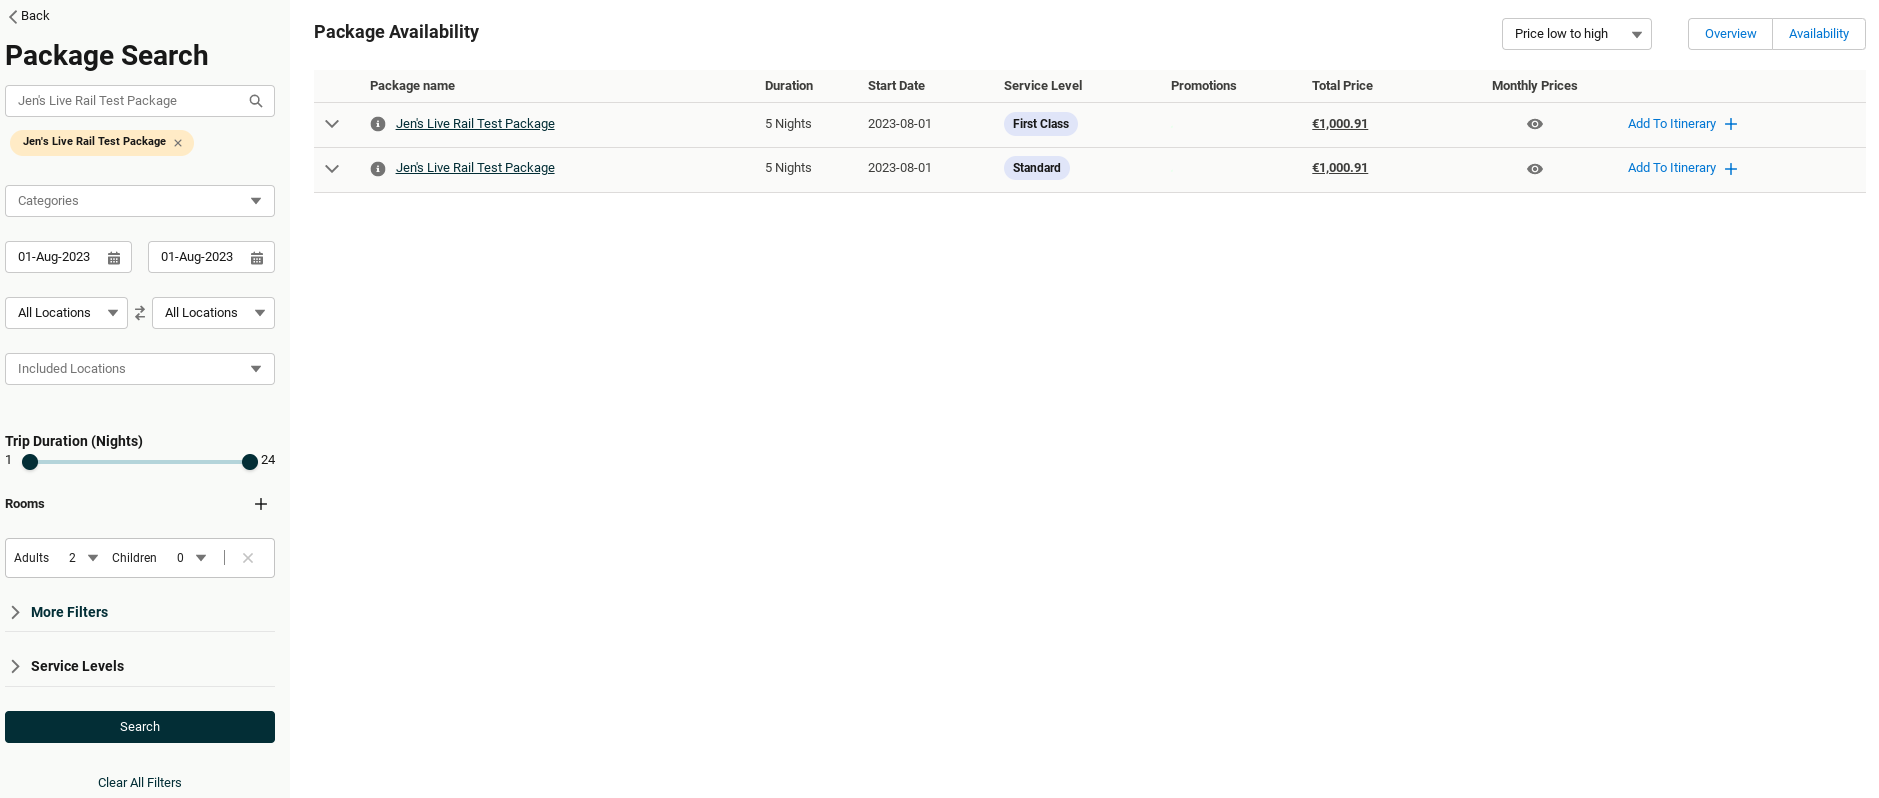
Package Search
So, what does this look like on the Package Search?
When a user selects a package in the package-search, that contains a live-rail, the live-rail prices will originate from the cache. There will be no difference to what a user normally sees here.
Its only when the user clicks “Add to Itinerary”, the system executes a full live-search and auto-selects a rail trip that gets added to the itinerary.
| This feature is available with the New Package Search UI |
Rail Cache
To allow for Package prices to be shown on the Package Search for Live Rail Services, we have introduced a Rail Cache.
| The Rail Cache can only be set up and configured by Kaptio. |
A cache-entry has the following keys:
-
departure location
-
arrival location
-
departure date that was used to determine the cache-price (e.g. 2023-07-11)
and also contains this additional information:
-
standard: fare price (for a single adult), e.g. “124.50” -
premium: fare price (for a single adult) -
bedroom: fare price (for a single adult) -
currency (e.g. EUR)
-
when it was last updated
The above keys are used to look up cache-entries for package-search. The values are then used to calculate the price for the Live-Rail component based on the Fare Class of the Component Option (e.g. “standard” or “premium”).
| In order to calculate the component price: |
-
For adults, the system multiplies the cached price by the number of adults
-
For children, the system takes 50% of the cached price and multiplies that by the number of children
Initially, the system will use the prices of a single rail-search on a single day as the cached-price result for all the future days (24 months into the future). It will then use the results of the live rail searches to update the values in the cache (based on the departure + arrival locations).
| The system only uses a single cached rail price per departure/arrival location pair. |
The Cache prices are not updated for the following Live Rail Searches:
-
If the
departure_dateof the live-rail search is not at least 15 days in the future -
If the
departure_dateof the live-rail search lies between Dec 23 - Jan 02 (both days inclusive) -
If the
rail-searchcontains children
Predefined Manual Rail
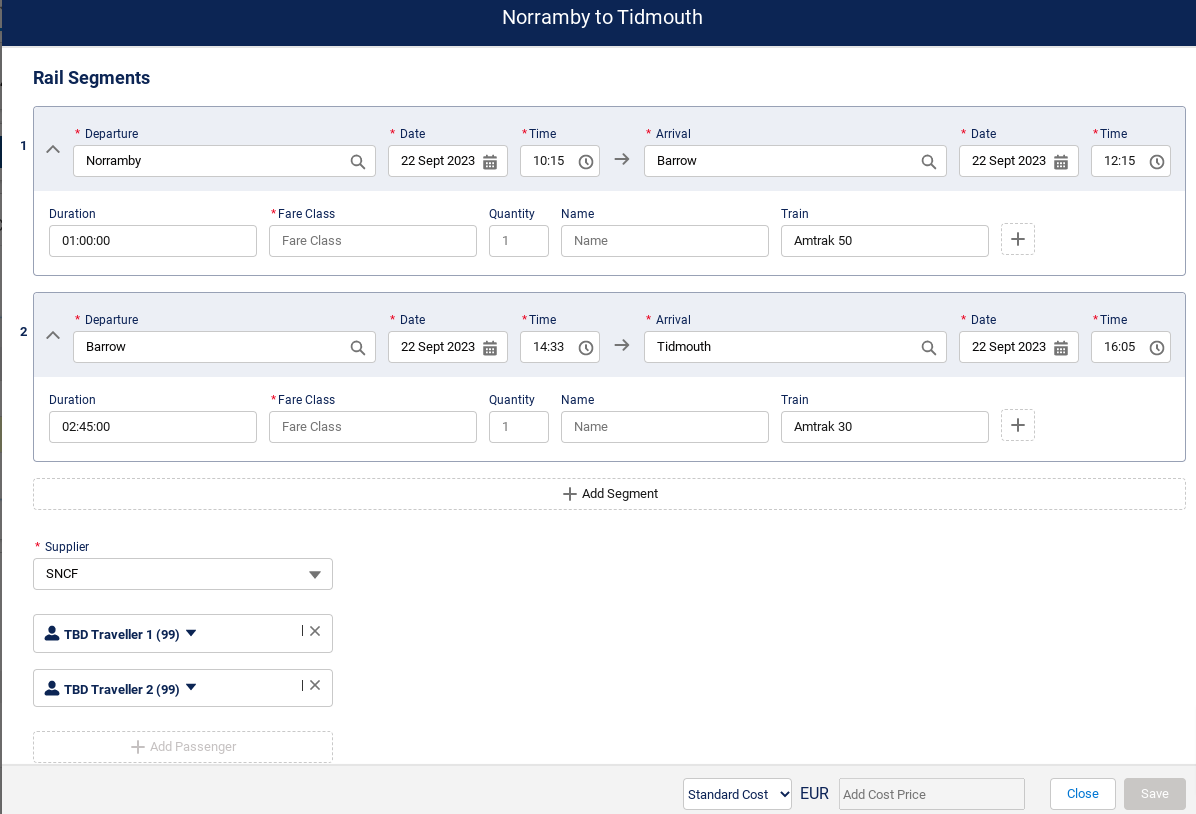
In this release we are introducing an enhancement to Manual Rail, which allows sales users to add rail journeys to their Itineraries with all rail segments predefined.
This feature allows for the Rail service to be pre-loaded with the full rail journey within the Service set up, and then for the sales users to add these rail journeys on the Itinerary Builder which then displays the rail segments.
This feature is available from the Itinerary Builder by selecting a new Service, the Manual Rail record type, the required start location and then the required rail journey service.
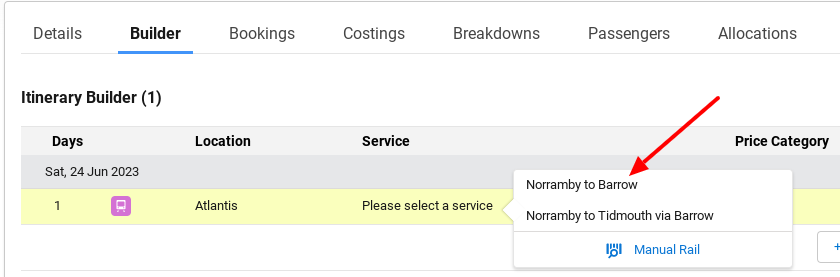
A modal will then display which shows the predefined rail segment(s). Sales users can then add/amend this as needed and save.

The following fields are mandatory and need to be completed for the Service to be saved:
-
Departure: selected from the Train Station Location list, e.g. Norramby
-
Date: departure date
-
Time: departure time in “hh:mm“ format
-
Arrival: selected from the Train Station Location list, e.g. Barrow
-
Date: arrival date
-
Time: arrival time in “hh:mm“ format
-
Fare Class: free text field to allow the type of fare to be inputted e.g. Standard
-
Supplier: selected from the Account - Supplier Record Type
-
Passengers: the passengers are auto-selected from the Passengers on the Itinerary. Passengers can be de-selected if they are not required for the Manual Rail booking.
| Some of these fields are already pre-populated from the rail segment set up on the Service. |
The Save button will be enabled once the mandatory information has been entered.
The following fields are optional and can be completed before the initial save or after (when amending this Rail service).
-
Duration: free text field to allow the duration to be inputted e.g.00 00:45:00 (days, hours, mins and secs)
-
Quantity: free text field for quantity. This would normally default to one but if booking a Roomette this could be changed to the number of roomettes that are required.
-
Name: free text field to allow additional information on the Fare e.g. Saver
-
Train: free text field for the Train name e.g.
-
Add ons: clicking the + icon allows for Train add ons such has vehicles and bicycles to be added e.g. Vehicle

The next step is to add a Cost Price for this Rail Service if required. This can be entered either as a Cost Per Unit or Cost Per Person. The Currency code will change depending on the Account currency linked to the Supplier Account (selected in the previous step).

Once saved, the Rail Service will display in the Itinerary Builder as per a 3rd party Live/API Rail service.

The rail segment details can be updated if required by clicking on the Rail Service (from and to)

How to Setup a Predefined Manual Rail Service
Once the Manual Rail set up steps have been completed, the Predefined Manual Rail service needs to be created.
-
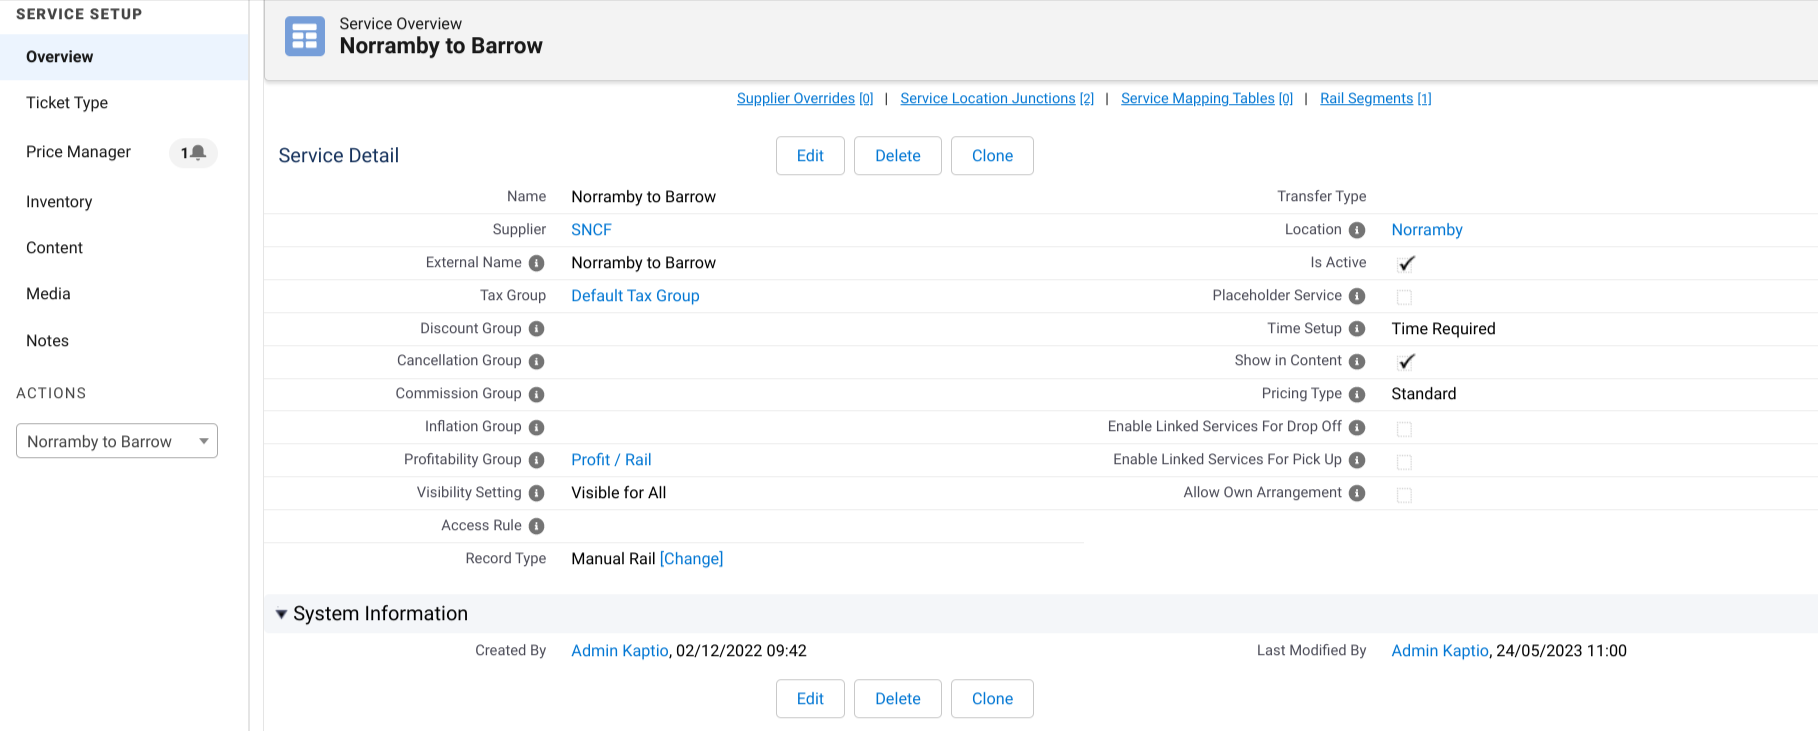
Create a new Service using the Manual Rail Record Type. Name this service as per the required rail journey e.g. Norramby to Barrow. The price category unit of measure should be set as per person.
-
In the Service Location Junction related list, add the required train stations for the required journey, e.g. Norramby and Barrow.

Next, the rail segment(s) need to be added. In the Rail Segments related list, click on New Rail Segment and complete the following information:
-
Name: free text field to add information of the name of the rail segment e.g. Norramby to BarrowDeparture Point Name: the departure train station name, e.g. Norramby
-
Departure Point Code: the departure point code e.g. NBY. NOTE: this would be the same code as the Gateway Location code.
-
Departure Date: Departure date
-
Departure Time: departure time in “hh:mm“ format
-
Arrival Point Name: the arrival train station name, e.g. Barrow
-
Arrival Point Code: the arival point code e.g. BRW. NOTE: this would be the same code as the Gateway Location code.
-
Arrival Date: Arrival date
-
Arrival Time: Arrival time in “hh:mm“ format
-
Duration: Free text field to allow the duration to be inputted e.g.00 00:45:00 (days, hours, mins and seconds)
-
Train Name: Free text field for the Train name e.g. Amtrak 60
-
Rail Segment Id: The order of the segment. If there is only one segment enter 1. If there are multiple segments this can be used to order the segments e.g. If Norramby to Barrow rail segment is set as 1 and Barrow to Tidmouth rail segment is set as 2. This segment order will display in the rail segments in the itinerary.


| A new Rail Segment object has been created. Rail Segment related list needs to be added to the required Service record type page layout. |

Bug Fixes
-
We fixed an issue when the Inventory Management midnight job was updating Units Released incorrectly on the Allotment Days.
-
Feature: Setup
-
Related support ticket: KHELP-7809
-
Kaptio has added a restriction to the Content article search modal when the modal is initialised within the Itinerary Document generation wizard. The Stage Type Category selection is now disabled during the document generation process and will default to the Stage Type Category which was selected at the start of the process. This option will remain enabled in other places where the search window is available.
-
Feature: Documents
-
Related support ticket: KHELP-6767
-
We fixed an issue when Supplier Buy Rate and Item Currency Factor BCY values changed unexpectedly on the itinerary item after selecting another price category on it.
-
Feature: Trip and Itineraries
-
Related support ticket: KHELP-9263
-
-
We fixed an issue for a service that had occupancy pricing enabled, but didn’t generate the correct price if passenger assignments were changed upon adding the service to Costings.
-
Feature: Costings
-
Related support ticket: KHELP-7612
-
-
We fixed an issue for when a PNR imported in Euros was being retrieved with no base fare for the ticket price.
-
Feature: PNR and Flight Placeholder
-
-
We have changed the Cancellation Group Rules setup, so that Cancellation Fee % input gets cleared and disabled when Exclude From Cancellation flag is set on the Cancellation Rule.
-
Feature: Setup
-
-
In this release * We fixed a issue where the text added into 'pick up/drop off’ instructions on the itinerary builder for own arrangement services remains after saving.
-
Feature: Itinerary Builder
-
-
In this release we auto populate the arrival date field of the Flight Placeholder with the same date as the departure date field. The departure date field has previously been changed, so that it auto-populates to the current date of the itinerary item the Flight Placeholder is being added to. This fix means the default behaviour of the two fields is the same.
-
Feature: Itinerary Builder
-
Related support ticket: KHELP-9591
-
-
The following enhancements have been made to the Linked Services feature. The time field on the Linked Service Seasons screen has been updated to indicate to users it is a mandatory field, and on the Linked Services tab, a user will now see an ‘Active Season’ label when a linked service season has an active date range.
-
Feature: Setup
-
-
The help text for the Service Inflation Group has been updated.
-
Feature: Setup
-
-
An Itinerary Builder UI issue was fixed where a Service set up with Service notes, and included in a Package made the Service Notes icon inaccessible.
-
Feature: Itinerary Builder
-
-
Users will now see a Price and Cost return for Internal Accommodation and Activity Services in the Service Search, if these are set up with Occupancy Pricing (Supplier Price Roles enabled).
-
Feature: Service Search
-
-
The Enable Passenger Information field has been removed from the UI on the Kaptio Settings > Trip & Itinerary Settings screen.
-
Feature: Setup
-
-
The package search name field has been enhanced to allow users to search for the package on an exact name, starts with, ends with, or contains a partial match to the package name.
-
Related support ticket: KHELP-7433
-
Feature: Package Search
-